By now anyone who is a friend of mine on Facebook is probably aware that I’m one of those slightly crazy people that have an abnormal attraction to all things Domokun.
I have lots of Domo Qees. I own several Domo shirts
. I bought Domo shirts for both my kids. I even have some on my keychain. I play Planet Domo on Facebook and have gotten Buddy totally addicted to it too.
So with that in mind, I have wanted to do Domokun Cake Pops for a really, really long time. The only thing holding me back was my fear of melting chocolate. Seriously, it scares the crap out of me due to a long history of chocolate melting nightmares, a couple of which are from making… cake pops.
I only ended up with three decent ones, but I blame this on my chocolate skills again. I’ve learned a lot and I thought I should post this anyway for people who want to take what I did and try to improve on it.
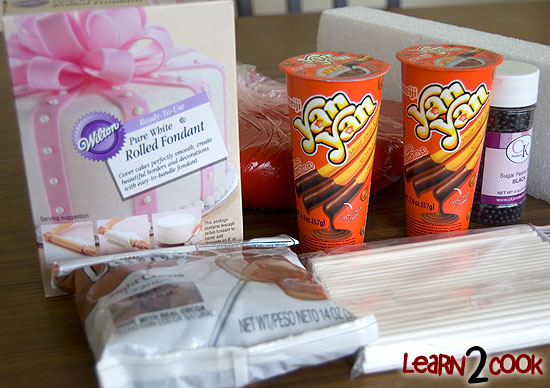
- 1 box cake mix (I’ve realized, when those things are only sale for $1 each, buy a ton!)
- 1 bag milk chocolate chips (the wafers pictured sucked)
- lollipop sticks
- Yan Yan
- white fondant
- red fondant
- Edible Sugar Pearls Black 4mm
- styrofoam block
- bubble tea straw
Bakerella says to mix the baked cake with a jar of ready made cream cheese frosting, but that stuff tastes disgustingly sweet and imo ruins the taste of the cake pop. Make your own cream cheese frosting and try some after you make it. Trust me, you’ll want to sit there and just spoon it into your mouth until it’s all gone.
Measure out exactly 2 tablespoons of cake pop mixture for each Domo. Shape them into little rounded rectangles.
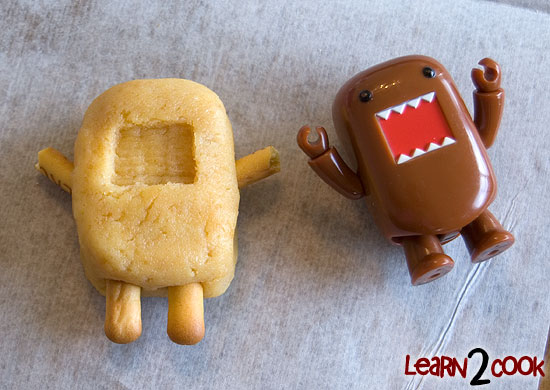
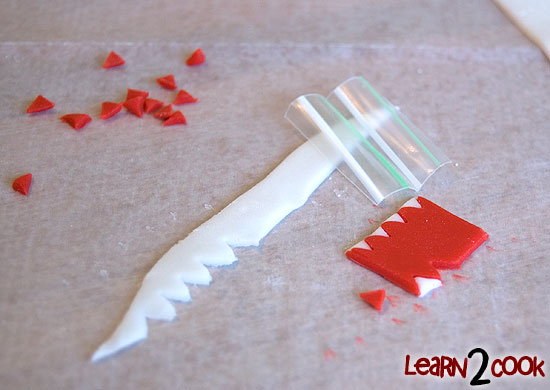
Cut a piece of bubble tea straw off, then cut it in half lengthwise. Fold it down the middle, then bend it backwards. Use the pointed tip to cut teeth out of the red and white, then use a toothpick to guide the white tooth into the red indentation. Domo needs four teeth on top and bottom.

I didn’t have my technique down yet and there were also lumps of shortening I couldn’t get out. As you can see though, the sugar pearls worked fantastically and the mouths came out great, though I was too slow and didn’t press it in fast enough. I found the arms sticking straight out was a lot easier than the arms going up. I got extremely messy doing this because my chocolate wasn’t very runny.
I don’t understand why I can’t get nice, smooth, runny chocolate. There should be a book called Melting Chocolate for Dummies. All I ever get is smooth, almost-runny chocolate.
Next, I tried chocolate chips with shortening and I gave up on the sticks. I also started just using my hands like crazy. I tried gobbing chocolate on and then smoothing it all off with my pointer finger and shockingly enough, this worked quite well. After that, I had to hastily wipe my fingers and grab the mouth, push it gently on, then add the two pearl eyes before it could all dry.
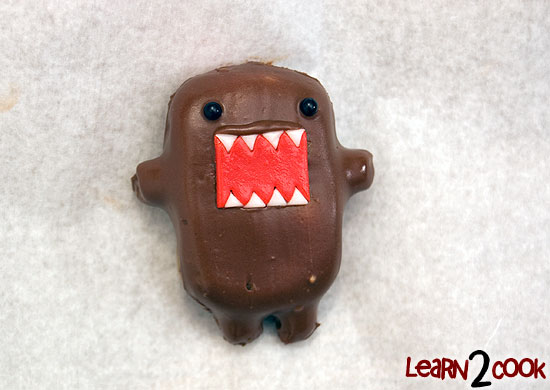
He is, however, a farce. In my eagerness to achieve runny chocolate, I put too much shortening and as a result, he’s not drying. I currently have him in the freezer and will offer him to Buddy later, since he fell asleep in the middle of making these.
We had some pretty ugly trials. My first pop was wide and had spikes of chocolate all over his back. Baby Girl’s reaction?
“Um, Mommy. I have to let you know something. That Domo is a little fat. And hairy!”
It’s true that the chocolate adds a lot, so you should make your Domos a little skinnier than you think they should be.
And now I will show you what happens when you don’t chill your Domos long enough.
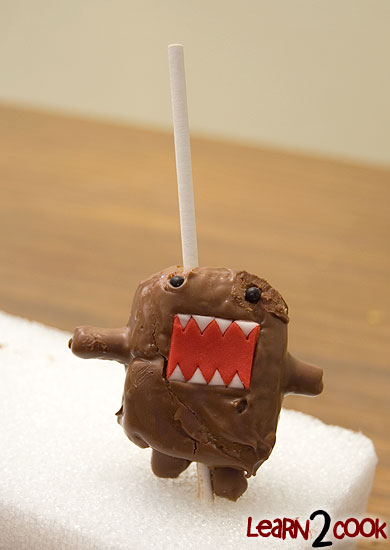
Although I don’t have a lot of cute Domo pops to show for my work, I’m happy that I was at least able to achieve what I’d been imagining. When I master runny chocolate, I will be back! Big thanks to Jenn for the wafers and styrofoam!
[ratings]

So cute and original! I plan on making cake pops but there are so many Ideas that I don’t know where to go first with my ideas.
You might want to try Almond Bark melting chocolate/candy coating. It’s mixed perfectly and melts like a dream. It’s the only chocolate I will ever use again when melting that stuff. Found this after cooking for 20 years, seriously I thought I was in heaven when I found it. ^.^
Hmm, interesting. Any idea of common places to buy it?
Haha, if you haven’t made them before, start with your easiest idea!
I get mine at Wal-Mart. It’s about $3 for a bag (maybe a little more) and I’m too lazy to run downstairs to see how much you get, but it’s a lot. Found in the baking section. It comes in huge bar block.
http://www.walmart.com/ip/Plymouth-Pantry-Almond-Bark-Chocolate-Baking-Bar-24-oz/10313776
So far I’ve used the white chocolate, milk chocolate, and dark chocolate. Amazing and dries nice and quickly too~
Oh yeah, I for serious, nuke the stuff and mix it. Not even bothering with a durn double broiler.
Thank you!!
So glad that the melts went to someone who used them. Sorry they sucked though. Maybe now I can say it was the melts that were crap and not my cake pop-making skills LOL
I love Domo! Your perseverance is impressive, I would never be able to make these, hah.
Super cute! I’m a big fan of Domo :)… and Domo merchandise, haha. That last photo of the skewered Domo made me giggle. I agree that homemade frosting is much better than premade frosting (wayyy too sweet).
And I totally understand your cake pop dilemma! I don’t know why, but I’m horrible at making cake pops, even though they’re supposed to be “easy” to make. Each time I try using candy melts, it’s always a nightmare, like how you described, thick and doesn’t coat the pops very evenly even though I follow the directions on the package. So I always end up melting bars of semisweet or white chocolate instead (much easier in comparison).
Your domos are too awesome. I’m wondering though why you aren’t just using baking chocolate and whipping cream. Make ganache, it spreads well, is totally delicious, and will harden enough. Heat 3/4 c heavy cream to boiling. Take off burner and add 8 oz chopped baking chocolate (don’t use chips, they have something that makes them keep their shape so they don’t melt or spread well). Stir once and let melt. Stir a little more and let cool until spreadable.
I still have some left, so I’ll put them to good use this time with chocolate covered strawberries!
Yeah the mouths were kinda demented hard. lol!
OMG I never even heard of Domo til they had advertisements a few years ago with Domo all over them! My husband loves Domo too!
Really cool, but I’m not sure I would be able to eat Domokun.
i was reading a recipe for rainbow cookies which get coated in chocolate and someone said if you add butter and heavy cream its very smooth and creamy BUT it doesnt set as hard.
thanks for sharing! i’ve used your advice here to make some domo cake pops. here is the link to my domo cake pops (http://www.flickr.com/photos/island_posies/sets/72157627104064069). the domos in my first attempt was too large and heavy, and so i made a ‘cookie cutter’ mold (made from soda can) and manage to keep all of them to one size that could hold up on the stick. also instead of breaking the biscuit sticks to 2 parts, i kept it the whole length through so when the lollipop stick goes in, the chocolate stick ‘arms’ that is now across the body prevents it from ‘father brennan’ scenarios.
If you’re not super duper careful with the candy melts, they overmelt really quickly and become too thick. I use them, but I’d much rather use the melt & mold chocolate from Ben Franklin. (Although it’s like almost $6 a bag.) One thing I’ve learned from making cake pops almost every month is to invest in one of those Wilton Chocolate Pots. It melts the chocolate at a low heat and you can keep it fluid by putting it on warm after it melts. It’s a lifesaver since I tend to burn chocolate in the microwave. Since I’ve been using mine, the Wilton Candy Melts have been much easier to work with.
But those Domokun are adorable! I think I found my next project!!